Featured Article

Please see our Fluorescent Microscope / Fluorescence Microscope section to find manufacturers that sell these products
Fluorescence, a contrast technique known for its specificity and sensitivity, has not only become “the” technique of choice for biologists, but is also enjoying increasing use in medicine, pharma, materials sciences, and semiconductors.1 There is also a burgeoning new market in optogenetics and a dramatic rise in stereo fluorescence. With strong development in fluorescent probes, light sources, filter design, cameras, and accessories, fluorescence is a major driver of growth in microscopy. This article surveys the central issues to consider when adding fluorescence microscopy to your lab, and cites key industry leaders in each sector.
The light budget
In many ways, fluorescence is like a household budget, using energy as a currency. In the simplest terms, it is a matter of energy in (excitation) versus energy out (fluorescence). It is all a matter of quantum efficiency. As microscopists, our job is to maximize the output by optimizing five system components: the sample, light source, wavelength selection, optics, and detector. Each of the sections below investigates key questions for those components as well as locations to begin researching solutions. To learn more, visit the learning centers of any of the major microscope companies: Carl Zeiss,2 Leica Microsystems,3 Nikon,4 and Olympus.5
The sample sets the rules
The sample is the mastermind behind the budget. Is it autofluorescent or tagged with a fluorophore? At what wavelength does it fluoresce best? How much light can it handle? Is it living or photosensitive? Does it photobleach? On the incoming side, answers to these questions determine how much light can be used for excitation. On the outgoing, fluorescence side, the two key questions will always be: “How bright is the fluorescence?” and “What is the optimum wavelength for collection?”
Figure 1 shows the spectrum of the fluorophore, FITC (fluorescein isothiocyanate). This amine-reactive probe is widely used for covalently labeling proteins and provides a useful model for understanding fluorescence. To begin, note that there is an absorption (excitation) curve on the left, in the blue area of the spectrum, with an excitation peak at about 490 nm, and an emission (fluorescence) curve on the right, in the green region, with an emission peak at approximately 525 nm. Two points to consider: First, these are curves, with shoulders of a specific slope, not just the single peaks which are too often cited in fluorescence data. Also, they overlap. This problematic area will be discussed below, in the section on wavelength selection.
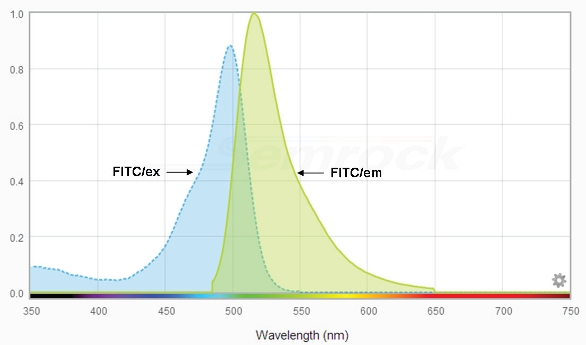 Figure 1 – FITC spectrum (pH = 8.0) of the widely used fluorophore. Y axis: transmittance = 1.0. Constructed using Semrock’s searchlight (www.searchlight.semrock.com).
In materials science and semiconductors, many polymers autofluoresce. It is worthwhile trying them with several different fluorescent setups to see what new information can be gleaned.
In the life sciences, the science of fluorophores has become a fine art. The Molecular Probes handbook6 has been the industry resource since the mid-1980s and now lists over 3500 probes covering a broad range of chemistries, functional groups, and biological processes. In addition, they discuss best practices for improving staining as well as the impact of secondary factors such as shift in pH or the presence of competing ions. Invitrogen, the parent of Molecular Probes, now falls under Life Technologies, recently acquired by Thermo Fisher Scientific (www.thermoscientific.com). The Life Technologies website (www.lifetechnologies.com) is a good place to start one’s education in fluorescence.
Light source
The most important issues when choosing a light source are its intensity at the excitation wavelength and its spectral breadth and purity. Traditionally, arc sources were used because of their intense peaks at or near the excitation maxima of key fluorophores. As shown in Figure 2a, mercury arcs (labeled “HBO”) have a very strong peak at 436 nm that falls high on the left shoulder of the FITC excitation curve. In comparison, xenon arcs (Figure 2a, “XBO”) have much broader, flatter spectra that are appropriate for other probes. Their intensity falls between that of the tungsten halogen illuminators used for brightfield and phase contrast and the spiky peaks of the HBO.
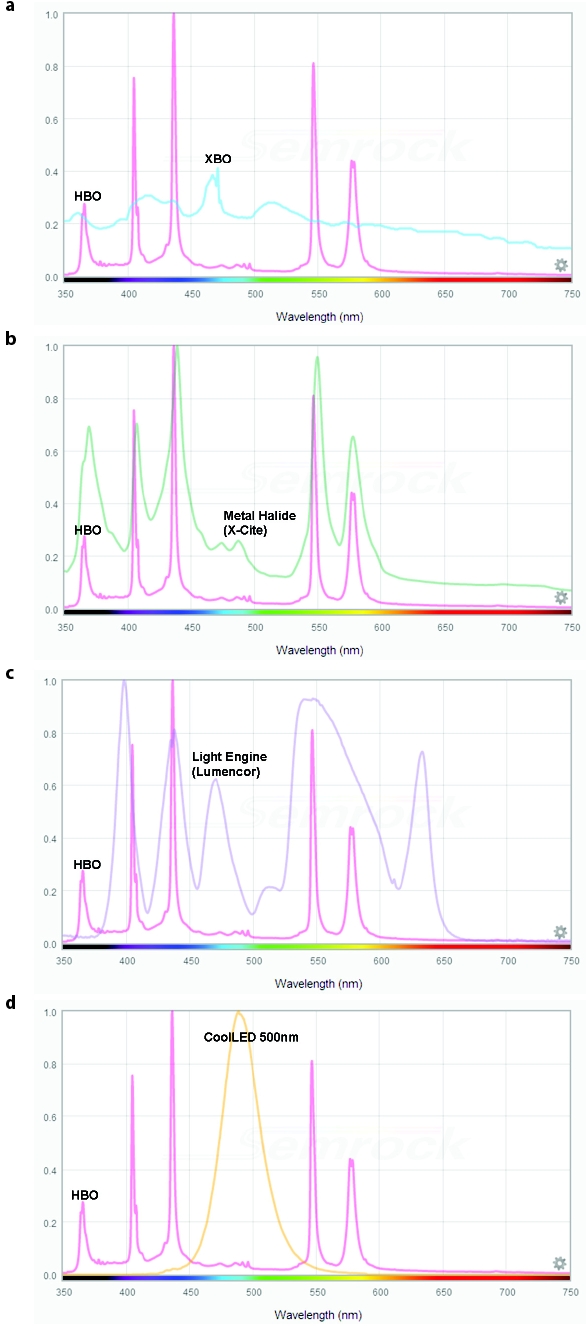 Figure 2 – Comparing spectral output from diverse light sources. Mercury arc (HBO, pink line) is used for reference: a) xenon (XBO), b) metal halide (X-Cite), c) Light Engine (Lumencor), d) 500 nm LED (CoolLED). All spectra constructed using Semrock’s searchlight.
Today, choices in fluorescence illuminators are limitless. In addition to traditional arc sources, microscopists have a broad range of metal halide, LEDs (light-emitting diodes), microLEDs,7 and lasers from which to choose. Each has its own advantages and disadvantages. Mercury arc lamps have very bright peaks at key wavelengths. However, they have short lives (100–200 hr, on average); typically lack the ability to tune intensity unless used with a special lamp house; and are under high pressure, so must be handled with great care, including donning gloves and goggles when replacing them. Metal halide lamps (Figure 2b) provide greater intensity, especially through the valley between 490 nm and 550 nm; enjoy much longer life (2000 hr); and are prealigned.
In comparison, lasers provide absolutely collimated light at high intensity, at very specific wavelengths. For example, the 488-nm output of the argon ion laser is perfect for FITC excitation. On the downside, they are expensive (often costing tens of thousands to over $100,000) and can be difficult to align. LEDs (Figure 2d) fall in the middle, providing stable, prealigned illumination over narrower band wavelengths more economically. Currently they are limited to only specific wavelength regions, as shown in Figure 2d, but emerging white light LEDs are garnering a lot of interest.
The best place to start shopping for a light source is your microscope vendor. All of them supply traditional HBO and metal halide systems. Carl Zeiss was the first to offer a multiple LED system in the elegant Colibri and holds the patent for use of LEDs in fluorescence microscopy. However, its competitors now offer similar systems. In the U.S., CoolLED (www.CoolLED.com) and X-Cite®(Lumen Dynamics, now an Excelitas Technologies company, www.ldgi.com/x-cite) have joined the LED club; overseas, Fraen (www.fraen.com) offers an interesting transmitted LED light system8 useful for the clinical lab.
X-Cite was the pioneer and still holds the lead in metal halide technology. It was joined recently by 89North (www.89North.com), the first company to offer a direct mount system.
Lumencor (Figure 2c, www.lumencor.com) takes a different approach, offering Light Engines9 that include all the optical components necessary to deliver illumination to the source. Lumencor systems feed LED illumination into chambers with proprietary phosphors to generate light in specific wavelength regions. The engines can contain multiple sources, with the intensity of each output individually controllable, and can also be configured with wavelength switching, shuttering, and a variety of delivery systems ranging from liquid light guides to fiber optic to direct coupling.
In the world of lasers, the two acknowledged leaders for microscopy are Coherent (www.coherent.com) and Spectra Physics (now part of Newport, www.newport.com/cms/spectra-physics). One caveat: When researching fluorescent illuminators, do not be confused with the ring lights used on stereo microscopes or the simpler, single LED systems used in lower-end laboratory and student scopes.
Selecting the right wavelength
Fluorescence is often 1/1000th to 1/10,000th the intensity of ambient light. For example, have you noticed the grass in your yard fluorescing red? Under the full spectrum excitation of sunlight it does, but the signal is swamped by the much greater intensity of the reflected green light. In microscopy, a specially designed filter system is used to separate these two curves and reveal the fluorescence.
Figure 3 is typical of a filter set that would be used for FITC. Figure 3a depicts the three key optical components: the excitation filter (F1), the emission or barrier filter (F2), and the dichroic mirror or beamsplitter (DM). Figure 3b shows how each component operates on FITC’s spectrum. For this discussion, keep in mind that FITC’s excitation maximum is about 490 nm and the emission maximum is 525 nm.
 Figure 3– A typical fluorescence fi lter cube: a) optics, b) impact on the fl uorophore’s spectrum. Filter set used as example: Chroma 49011 (Chroma).
F1 is an excitation filter, designed to select and transmit only the desired excitation wavelength. It will have a notation that indicates the wavelength selected and the bandwidth. In this filter set, F1 is a 480/40, indicating peak transmittance at 480 nm with a band pass of ±40 nm. As shown by the dark blue profile on the spectrum (3b), it captures a large portion of the excitation curve.
The dichroic mirror is an optical element that acts like a gatekeeper, reflecting short wavelengths and transmitting longer wavelengths. As shown in Figure 3a, the incoming excitation light is reflected down to the sample where it interacts, producing fluorescence. The light returning from the sample contains multiple components: reflected excitation illumination, reflected ambient light, and the actual fluorescence. The gate for DM in the Chroma 49011 (not shown in 3b) is set at 510 nm, indicating that it will reflect any residual excitation illumination and reflected shorter wavelength ambient light back into the microscope, where it is absorbed, and transmit all fluorescence longer than 510 nm, effectively separating the excitation and emission curves.
F2’s role is to maximize and clean up the fluorescent signal. Figure 3b shows that it is comprised of two filters: a long-pass (LP) filter with a full width at half maximum (FWHM) of about 520 nm (green profile) that transmits all wavelengths longer than that value, maximizing the fluorescence collection, and a 535/50 filter (red profile) that selects the bulk of the FITC emission curve.
The ability of a filter to select a portion of the fluorophore’s spectrum raises an interesting question: What is the real color of fluorescence? Clearly, the choice of filter set is going to have an impact on what you will see in the microscope.
There are two other important points to note about F1 and F2. First, they exhibit very high transmittance over their respective spectral ranges, maximizing the intensity for excitation and emission, respectively. Secondly, their steep shoulders and tight adherence to the baseline indicate that they strongly exclude unwanted wavelengths, limiting background and producing crisp, strong signals. Both factors are important to consider, especially if your application needs a specialized filter set.
Three companies lead in providing filters for microscopy: Omega Optical (www.omegafilters.com), Chroma (www.chroma.com), and Semrock (www.semrock.com). All three have excellent tools on their websites to help optimize the light budget based on both the fluorophore and the light source. Semrock goes a step further, providing advanced analyses using parameters such as light source power, the numerical aperture of the objective, refractive index, and autofluorescence factors.
The optics and the stand
Most fluorescence is conducted on compound microscopes in what is called “epi” mode, with light coming from “on top of” the sample, as shown in the filter cube example in Figure 3. This choice, solidified in the early 1980s with the advent of better fluorophores and filter sets, allows for the most efficient collection of fluorescence. However, exceptions do occur, as with the Fraen system mentioned above.
Installing epi illumination typically involves a light bridge that sits on top of the microscope, between the microscope and the binocular body. At one end will be the connection for the light source. Internally, there will be at least an aperture iris (the reflected light or epi version of the condenser aperture iris in conventional transmitted light microscopy) and, often, a field diaphragm that can be used to moderate background fluorescence. At the other end, there will typically be a turret assembly which provides locations for multiple filter cubes and/or other accessories used in reflected light mode.
Dr. Sebastian Ploem commercialized the first of these filter wheels, introduced by Leitz (now Leica, www.leica-microsystems.com). He was recently nominated for a Nobel Prize for that invention. While there have been small accessories that enable the conversion of a single objective to fluorescence, for most applications, purchasing a stand capable of full epi illumination and having the ability to easily change from one filter cube to another is a better solution.
Optics are an important part of the light budget. Since the ultimate goal is collecting as much fluorescence as possible, there are two rules of thumb when choosing optics: high numerical aperture and low magnification. Intensity is proportional to the fourth power of the numerical aperture or collecting angle of the objective (NA4). If your sample emits weak fluorescence, it will be important to invest in high numerical aperture plan apo objectives. Water and oil immersion also improve NA. If the fluorescence from your application is bright enough to be imaged readily, save the money and invest in a reasonable set of plan fluorite objectives.
Once you have collected as much fluorescence as possible, it is important not to spread it out. Intensity is inversely proportional to the magnification squared (M2). This magnification is the total magnification, calculated using the magnifications of the objective, the eyepieces, and any intervening optics such as mag changers. If your application permits, try working with a 60× objective rather than 100×, using the electronic magnification in your imaging system to make up the difference. Also, try 5× eyepieces rather than 10× or 12.5×. Also, don’t forget to check the magnification in the photo system.
A third factor to consider in the optics is the excitation wavelength. The glasses used in most optics have a sharp cutoff somewhere around 380 nm. If your probe requires UV excitation, all the optics in the microscope from the lamp housing through the transfer optics, the filter cube, and the objective will need to be quartz.
Who can help you make the best decision regarding the stand and optics? This is a discussion to have with your microscope representative.
Stereo fluorescence
 Figure 4 – Nightsea’s simple components convert any stereo into a fluorescence system.
The past half-decade has seen a rise in the addition of fluorescence to stereos, enabling interesting applications, especially in genetics, for sorting everything from fly larvae to mouse pups, and from microdissection to microsurgery. Large stereo microscopes fitted with fluorescence are priced in the $20–50K range. Their stability and flexibility are worth the money for the right application, but there are hundreds of thousands of lab-level stereos sitting on shelves, gathering dust, that can be put to use using the new Stereo Fluorescence Adapter (SFA) from Nightsea (www.nightsea.com) (see Figure 4). Simple, easy to use, and available in a portable model,10 the SFA offers economical modular kits, providing a viable alternative for routine work11 and education.12
Detector
The key driver for camera selection is the signal-to-noise ratio. If all fluorescence were bright, the decision would be easy: Use a conventional RGB (red-green-blue) color camera, cMOS (complementary metal oxide semiconductor), or CCD (charge-coupled device). However, since most fluorescence applications are light starved, color cameras are not a good choice. A better choice might be a good black-and-white camera.
The questions that drive camera choice are similar to those we’ve seen in all the other components:
- How much light do I have?
- What is the ability of the camera to collect (its quantum efficiency, QE) at the wavelength I care about (its effective quantum efficiency, EQE)?
- How much electronic or read noise does the camera have?
When evaluating noise, make sure to consider the RMS (root mean squared) rather than median values. The median is that point where half the noise is higher and half the noise is lower, but does not really characterize the camera. RMS considers the outliers as well. One other thought regarding EMCCD (electron multiplying charge-coupled device) technology. It has an additional noise factor that effectively cuts the QE in half, generating a much lower EQE.
No one camera will fit all requirements, but the manufacturers often provide white papers13 and knowledge centers14 outlining important characteristics. Microscope reps, camera manufacturers, and independent system integrators can all be helpful in defining which camera will best fit your application. Leaders in the monochrome cameras that are especially pertinent to fluorescence include the microscope companies and Andor (www.andor.com), Hamamatsu (www.hamamatsu.com), Princeton Instruments (www.princetoninstruments.com), Photometrics (www.photometrics.com), Qimaging (www.qimaging.com), and Thorlabs (www.thorlabs.com).
Summary
While this article contains a number of considerations, we’ve just touched the surface when it comes to fluorescence. On the horizon for further discussion: more exotic techniques such as TIRF (total internal reflectance microscopy); FRET (Förster resonance energy transfer); super resolution techniques such as PALM (photo-activated localization microscopy), STORM (stochastic optical reconstruction microscopy), and STED (stimulated emission depletion); and techniques requiring considerable modifications of the stand and light source such as confocal and multiphoton microscopy and expansive rigs for optogenetics. However, they all have one thing in common: They are all based on fluorescence, and all benefit from a good understanding of the light budget.
References
- Ongoing research from Microscopy/Microscopy Education (MME, www.MicroscopyEducation.com).
- http://microscopy.zeiss.com/microscopy/en_us/solutions/biosciencetasks-applications/fluorescence-microscopy.html.
- http://www.leica-microsystems.com/applications/fluorescence/learnmore-about-the-leica-fluoscout/.
- http://www.microscopyu.com/articles/fluorescence/.
- http://www.olympusmicro.com/primer/techniques/fluorescence/fluorhome.html.
- http://www.lifetechnologies.com/us/en/home/references/molecularprobes- the-handbook.html.
- Henry, W. MicroLEDs enabling new generation of fluorescence instruments; Photonics, Apr 2013; downloaded from http://photonics.com/ Article.aspx?PID=1&VID=108&IID=681&AID=53574.
- AFTER® Amplified Fluorescence (by) Transmitted Excitation (of) Radiation; downloaded from http://www.fraen.com/pdf/Fluorescence_ Microscope.pdf.
- Baird, T.R.; Jaffe, C.B. Light Engines: lighting the way to mercury free microscopy; BioOptics, Nov 2013; downloaded from http://lumencor.com/wp-content/uploads/2013/06/13039Z-1263e-BOWEprint.pdf.
- Fluorescence Anywhere, a video. View at www.nightsea.com/ sfa-videos/.
- Using routine fluorescence stereo microscopes for sorting Drosophila larvae; downloaded from https://www.nightsea.com/wp-content/uploads/2013/10/NIGHTSEA_AN1_Using-routine-fluorescence-forsorting.pdf.
- NIGHTSEA helps U Montana’s exciting spectrUM Discovery Area uncover the hidden world of neuroscience; downloaded from https:// www.nightsea.com/wp-content/uploads/2013/12/NIGHTSEA_AN3_ spectrUM_and_NIGHTSEA.pdf.
- Bridging the gap; http://www.hamamatsu.com/sp/sys/en/documents/ MAF13_Presentation_Final.pdf.
- Sensitivity of CCD cameras: key factors to consider; downloaded from http://www.andor.com/learning-academy/sensitivity-of-ccd-cameraskey- factors-to-consider.
Barbara Foster is President & Chief Strategic Consultant, The Microscopy & Imaging Place, 7101 Royal Glen Trail, Ste. A, McKinney, TX 75070, U.S.A.; tel.: 972-924-5310; fax: 509-479-2021; e-mail: [email protected]; www. the-mip.com.
Please see our Fluorescent Microscope / Fluorescence Microscope section to find manufacturers that sell these products